In today’s competitive ecommerce environment, a good customer experience (CX) represents real money – and optimising the shopping experience of your customers is crucial to driving conversions, growing revenue, and inspiring loyalty to keep customers coming back.
But without any data, how can you try to optimise your CX effectively? Sure, you can look at the amount of orders you’re getting, but that won’t tell you much about the overall shopping experience.
Enter: Google Analytics’ plugin – Enhanced Ecommerce.
What Is Enhanced Ecommerce?
Enhanced Ecommerce is a plugin that adds new metrics and reporting to Google Analytics (GA). It’s geared specifically to ecommerce websites, providing a way to pass detailed shopping behaviours over to GA.
This is GA’s second iteration of their ecommerce plugin. Whereas previously you could only track product and sales performance, now you can track a range of different interactions, all of which will help optimise your shopping experience.
Benefits Of Enhanced Ecommerce
There are a number of short and long-term benefits from leveraging Enhanced Ecommerce, including:
- Making better design decisions
- Unlocking more information about your products
- Understanding which marketing campaigns worked
- Understanding which sales campaigns worked
- Understanding which coupons worked
How To Get Started With Enhanced Ecommerce
1. Install Google Tag Manager (GTM)
Skip this if you already have GTM installed. GTM is a great tool, allowing developers and ecommerce managers to easily add marketing tags to a website without having to write a single line of code. Using GTM will make the Enhanced Ecommerce implementation easier.
Follow the instructions here to install it on your website or see if there is a plugin for your CMS.
2. Ensure You’re Using Universal Analytics
Enhanced Ecommerce only works for Universal Analytics. There’s a Chrome extension called Tag Assistant which will show you the type of analytics you have installed.
Install and enable the extension. You should see a happy little tag icon in your toolbar like this:

Click this tag icon to open the Tag Assistant. You will then see a list of Google-related marketing tags that you have installed. Click Google Analytics.
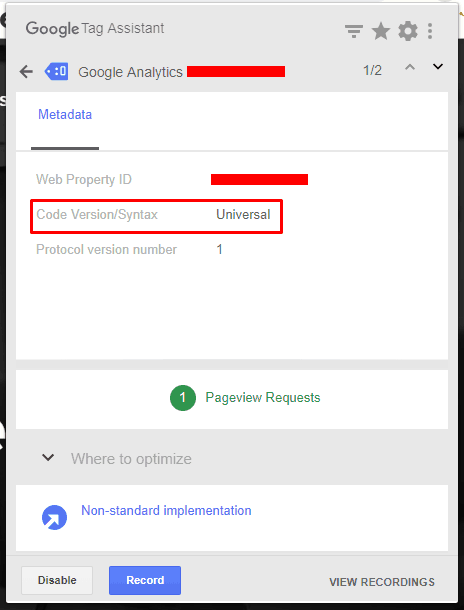
If you don’t see ‘Universal’, then you’ll need to update your analytics setup. Luckily, GTM makes this easy.
You can follow this guide to get it up and running.
3. Check That You Have Enhanced Ecommerce Enabled
In your Google Analytics settings, you’ll need to ensure that two options are enabled – “Enable Ecommerce”, and “Enable Enhanced Ecommerce Reporting”.
To find these options on your Google Analytics view, click ‘Admin’, followed by ‘Ecommerce Settings’. Without these options checked, you won’t be able to use Enhanced Ecommerce.

4. Prioritise Interactions
Determine the order of implementation for the Enhanced Ecommerce interactions. You can implement the following interactions (we’ll go into what these interactions do later in the article):
- Product Impressions
- Product Clicks
- Product Detail Impressions
- Add / Remove from Cart
- Promotion Impressions
- Promotion Clicks
- Checkout
- Purchases
- Refunds
We recommend the following priority:
- Purchase
- Checkout
- Add / Remove from Cart
- Product Detail Impressions
- Product Clicks
- Product Impressions
- Promotion Clicks
- Promotion Impressions
- Refunds
Your priority will depend on what interactions are important to you. You don’t have to implement it in a phased approach, but doing so will allow you to start collecting data while other interactions are being setup.
5. Checkout Interactions
Purchase
A purchase occurs when a users complete payment for products. You’ll need to pass a list of products along with typical sales data like total amount, tax and shipping.
Enhanced Ecommerce also allows you to pass a coupon value to both the transaction and product if the coupon is product-based.
With this interaction you can use the following:
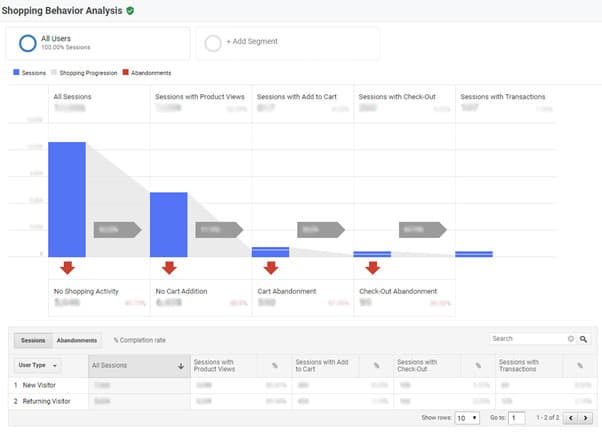
Shopping Behaviour Report
This drop-off graph shows you a high-level view of the Enhanced Ecommerce interactions. You can then answer questions such as:
- Why is the ‘No Shopping Activity’ value high?
- Is the user’s first point of entry not engaging them enough to click through a product?
Remember: All interactions will need to have been implemented for this report to be effective.
Sales Performance Report
This report shows you all transactions that have occurred. You can then answer questions like:
- How many transactions occurred during a certain period?
- Are our sales campaigns increasing revenue?
- Did our website update have any effect on sales metrics?

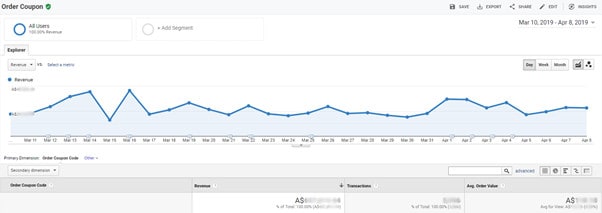
Order And Product Coupon Reports
These handy reports show what codes are being used by your customers, along with the associated sales metrics. Here are some questions you can answer:
- How many transactions have used the coupon <coupon-code>?
- What’s more attractive, percentage-based or fixed amount discounts?
- Where are users finding out about this coupon?
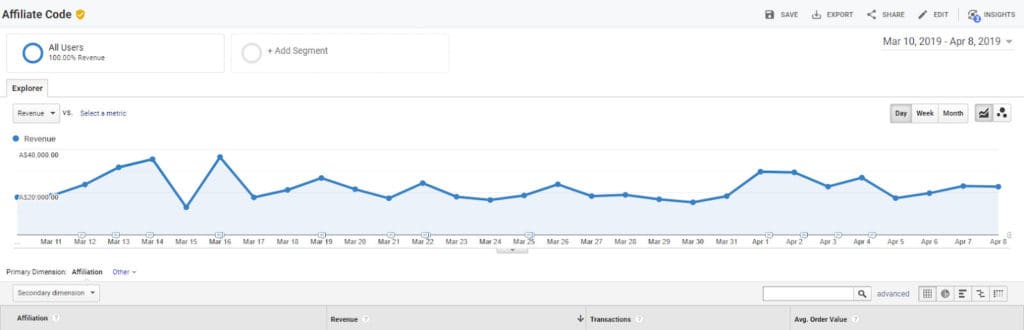
Affiliate Code Report
This report shows the performance of the affiliates your website uses. Here are some questions you can answer:
- How is the performance of Affiliate X?
- Do we need more affiliates to boost sales?
- What’s the average order value for people coming from a certain affiliate?
6. Product Interactions
Product Impression
A product impression is when a user views a product on a product listing page. Apart from the typical product attributes, a product impression should also have a value for:
- List – the product listing page name
- Position – the index of the product in relation to the other products
Based on websites we’ve looked at, sometimes all the products are sent as an impression even if the user hasn’t looked at it! This is bad practice and adds inaccuracy to your reports. Simo Ahava has created a guide on how to send impressions based on what the user has actually viewed.
Product Click
A product click is when a user clicks a product on a product listing page. Apart from the typical product attributes, a product click should also have a value for:
- List – the product listing page name
- Position – the index of the product in relation to the other products
Product Detail Impression
A product detail impression is when a user views a product page. If the product was clicked from the website, you should also pass the following:
- List – the product listing page name
Product Add/Remove From Cart
A product cart interaction is when a user modifies their cart in any way. This includes editing the quantity, which can be treated as an add or remove.
With these product interactions setup, you can use the following:
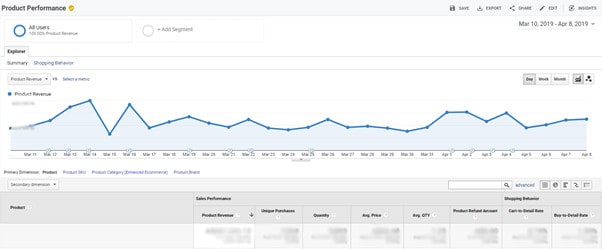
Product Performance Report
This report allows you to see how each of your products is performing. Apart from the sales performance, you can also see shopping behaviour like Cart-to-Detail Rate and Buy-to-Detail Rate. Here are some questions you can answer:
- How’s Product X performing?
- How’s Category X performing?
- Are my campaigns boosting sales of specific products?
- Should we stop selling Product X?
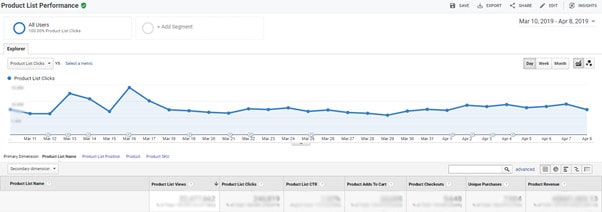
Product List Performance Report
This report allows you to see how product listing pages are performing. Here you can analyse each of your lists, looking at the views, clicks, checkouts and revenue made.
Here are some questions you can answer:
- Are my product listing pages engaging?
- Are people finding what they’re looking for when searching?
- Are people scrolling down the page?
- And more!
7. Promotion Interactions
Promotion Impression
A promotion impression is when a user views a promotion banner on the website. Here you pass information like the name, creative and position.As with product impressions, you want to make sure that you only send data if the user has viewed the element. GTM has a trigger called Element Visibility that should be used in this case.
Promotion Click
A promotion click is when a user clicks a promotion banner on the website.With these promotion interactions setup, you can use the following:
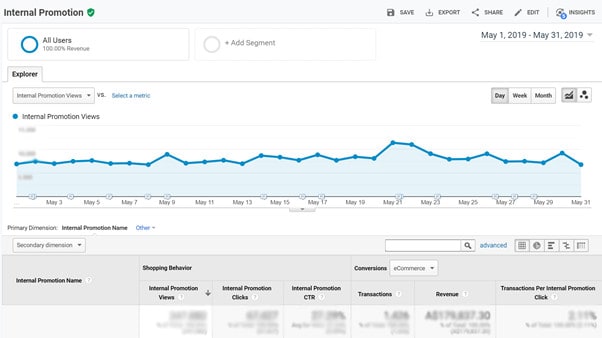
Internal Promotion Report
This report allows you to see how your promotions are going. Here you can analyse each promotion by looking at views, clicks, transactions and revenue made. Here are some questions you can answer:
- Are my promotion creatives encouraging clicks?
- How is Promotion X going?
- What is the conversion rate when clicking on this promotion versus another?
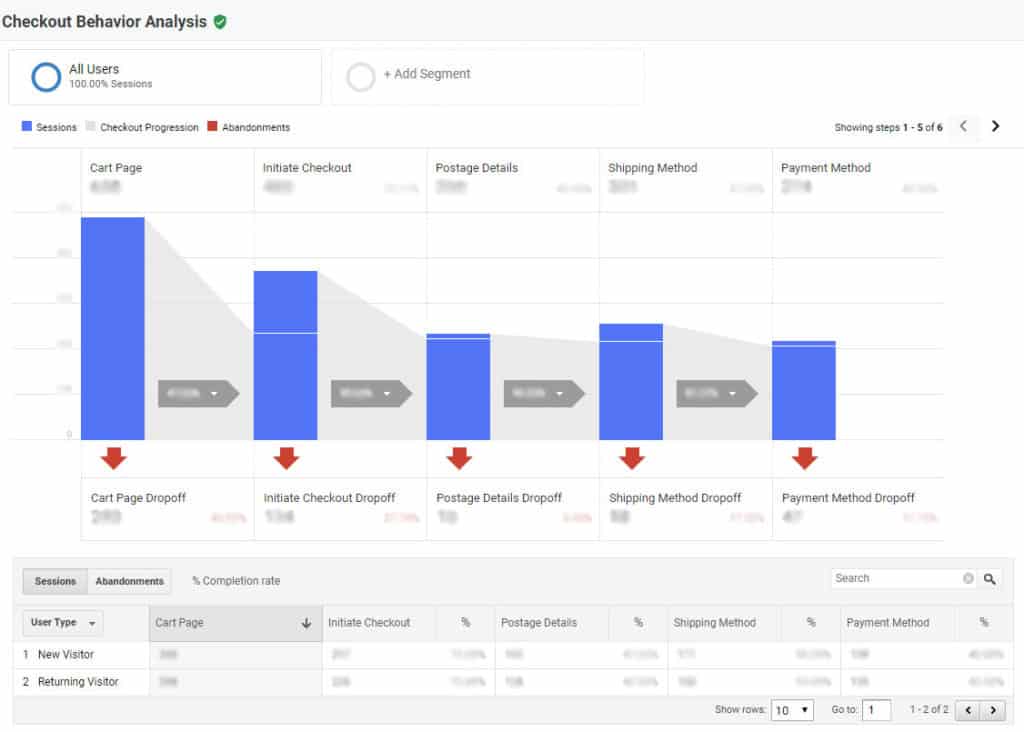
8. Tips On Creating The Perfect Funnel
Enhanced Ecommerce also allows you to track each step of the checkout flow using the checkout interaction.
The checkout interaction is step-based, so you need to determine all the crucial parts of the process that you consider steps. Here are some tips:
- Rather than track each page, also consider tracking each section. Sometimes account, shipping and payment steps are merged into one page. Using GTM’s Element Visibility you can fire interactions based on what section is visible on the page.
- Track important choices during the checkout using the checkout option interaction. This could be choices such as creating an account, shipping method or payment method. Each choice made will tie back to the current step.
- Consider creating a time option that fires on proceeding to the next step. Group users in half-minute intervals of time and send that value as a checkout option. Also set a maximum value grouping (e.g. “6 min+”) to avoid having many different groupings. This is great for optimising the process as you start to uncover the pain points in your checkout.
Here are some questions you can answer:
- What is the drop-off percentage from payment method selection to actual purchase?
- What is the highest drop-off area?
- Did the recent checkout change have an impact on the drop-off rate?
9. Refunds
If you have a refund feature on your site in place, you can implement tracking to record the user returning a transaction fully or partially. Here are some questions you can answer:
- Does one of our items have a design flaw?
- What is the most commonly returned item?
Tips For Testing
- Use a staging environment for testing
- Test different combinations of products
- Use this GA chrome extension to see if the data being sent is correct
- Watch out for duplicate transactions
- Account for different currencies if the site is global (e.g. tax rates)
- If working with affiliates, ensure you pass the affiliate to the purchase interaction
- Ensure you properly calculate metrics such as tax and discounts
- Test how sales and offers are applied to products
- Use this demo store to see how the interactions should work
Better Decision-Making Equates To Growth
And there you have it! Going through these tips will ensure a smooth Enhanced Ecommerce integration, helping you to identify new opportunities for improved customer experience and conversion optimisation going forward.
If an issue is missed when the Enhanced Ecommerce setup is live, it could lead to incorrect decisions being made in both a business and website view – so take your time. And if you’d like some guidance around ecommerce and understanding your data, get in touch with the Yoghurt Digital team today!